

So let’s be realistic. If you own poverty wizards, in any of their various forms, you know they’re actually more “smooth” looking than the (original) pocket wizard. Shooting portraits with a pocket wizard looks like you strapped a radio onto the top of your camera, and it nearly doubles the height of your camera probably. It also kinda looks like it doesn’t belong. Poverty wizards, on the other hand, have that sleek look, almost like they’re leaning forward eagerly, and they go well with the contours of your camera (unless you modded an antenna onto yours).
Being an event shooter, one of my primary concerns is syncing my camera with my room lights. I can’t do it optically and have every uncle set them off with his point and shoot. So I am left with radios. Since I can’t afford justify pocket wizards, I am using poverty wizards. In this aspect PWs and PvWs are the same; they both look awkward when attached with an on camera flash (SB, EX, HVL, etc.) Here are your options:
Option A is to use a flash bracket. These allow you to not only distance the flash from the lens, and usually to rotate it for verticals or horizontals, they also allow you to attach various accessories to the top of your camera which would not normally fit there. I see many event shooters with custom or extra function brackets, and they seem to be serving them well. Often they have a PW on a cold shoe or Velcro with a sync cord, sometimes a TTL cable with the flash on top of the bracket, sometimes with a Quantum up there. The upside is they are very versatile, tough, and can quickly be rearranged for specific situations; verticals, close up, bouncing the flash off the side wall at 3 feet, etc. The downside is they are fairly cumbersome, and no fun to hang on to for a long time. Also if you are constantly changing locations and running around, they don’t hang well on any kind of strap. And if you are static on top of a ladder, or some other far out position, there is no need for all the extra functions and you’d rather be light and comfortable, and not worried about tipping yourself off the ladder because of the rig you have attached to your camera.
Option B is to run a long sync cord to your PW/PvW and stick it in your pocket. This is the most annoying way, for about a million reasons. Try it once, you’ll see. I’ve done it as a last resort a couple times, it sucks.
Option C is to attach your PW/PvW to the top of your flash with Velcro or rubber bands or both.

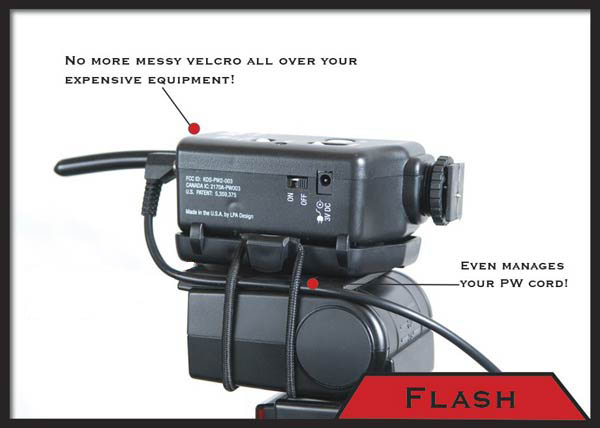 This method is not as secure as the bracket method, but when you’re running and gunning, this is easier to move with, and it only (roughly) doubles the thickness of your flash head. It fits smoothly with the ergonomics of your camera as it was without the PW. This is also better for those who don’t have camera sync ports but are using SB’s, as the distance from the sync port on the side of your SB to the top of the flash head is not very large, and you can use a smaller sync cord, which will hopefully cause you less tangles.
The problem with option C is that both PWs and PvWs don’t look very good on top of a flash head. Even a PW with its slightly boxy shape is still too contoured to look good on top of a flash. That’s why I feel this mod is the most important PvW mod there is.


What you need:
- · PvW (Poverty Wizard)
- · Soldering iron
- · Solder
- · Solder Skills
- · Battery compartment #270-411 for 4 AAA batteries (Radio Shack)
- · Pliers (needlenose), + optional wire cutters
- · Philips screw driver (smallish)
- · Sync cord (usually one comes with the PvW, although a heavier duty one is better)
- · Razor blade
- · A Brain!!!!!
Important note: this process is not reversible. There is also a possibility that you will permanently damage your PvW (although it’s never happened to me). I encourage you to only try this on your second or third PvW transmitter, just in case. Also, using tools is risky. Don’t do it if you can’t handle these risks. You should consult a physician, electrician, accountant, clergyman, and astrologer before beginning this project.
Start by taking apart the PvW. There is a screw on the bottom. Then carefully (by the edges) lift the circuit board. It is connected to the hot shoe on bottom with 2 wires. Snip those or yank them off the hot shoe connectors, but don’t ruin the spot where they connect on the board!
Now you have the guts of you PvW out. The next step is to excavate the innards of the battery compartment and get that board in there. First take out the screw and slide off the lid. Then, use the tip of the needlenose pliers. Grab a section of the plastic divider, pinch it in the pliers, then twist the pliers, trying to smoothly twist out as large a section as you can. The twisting motion should help the divider separate smoothly from the bottom of the battery compartment. Continue until the entire main section (where the batteries would slide) is emptied out. Try to fit the board from your PvW in there, and put the lid on. Make sure the battery is in their too! You may have to jam it at a slight angle so the battery will fit, but the lid should go on snug.
The next step is to measure how long your PC sync cable has to be. Measure from the pc port you will be using to where the PvW will be sitting on the flash head. Consider also that if you need to swivel or bounce, the head will turn, make sure the cord is long enough for that. Add a little extra just in case. Then a little more. Good. Now cut the PC wire, (at the end OPPOSITE from the PC connecter) and use the razor blade to expose a very small amount at the end of each wire. Also slice down a little between them so the red and black ends can touch the two soldering points where the board was connected to the hot shoe, on the bottom edge. Make sure that you only expose enough wire to connect the pc to the board, you don’t want them touching by accident and firing off your flash indiscriminately, possibly melting it.
VERY IMPORTANT!!!! Make sure that before you solder the pc cable to the board you run it through the hole in the battery box!!!!!! (otherwise you will have to take it off and do it again)
Run the pc cord through the hole in the box where the on/off switch used to be, making sure that the PC sync end will end up outside the box (duh).
Solder the ends of the cord to the 2 connectors on the edge of the board, which were formerly wired to the hot shoe. Make sure the 2 solder points don’t have any connection, otherwise you will not be able to fire, or it will fire indiscriminately. Now before fitting the board into the box, attach the battery, and use something metal to touch the center post and the edge of the PC sync end. Confirm that the remote is firing.
Fit the board into the battery case, it may have to go in at a slight angle so the battery will fit in. squeezing it slightly is fine. Try to run the cable between the remaining dividers, so that if it is yanked it won’t pull right off the board. Put the lid on. Before attaching the screw, test fire it using the pc cord like before, to ensure the battery is in the proper position. Attach the screw. You may now want to put Velcro on one side of the box to easily attach it to your flash head.
You are done.
Some notes. I have found that on mine if you squeeze the center of the box you can actually hit the test fire button, which is handy.
The thicker the PC cord you use, the less likely it will be damaged over time.
You are limited to the use of one channel, which honestly I have found to be less confusing.
You may want to consider always using one side of the Velcro for flashes, and one side for attachments. I use the soft side on the flash and the sticky side on all attachments.
Use a strong glue besides the adhesive that comes on the Velcro, it will last longer.
Keep spare Velcro with you on the job. I use Velcro cord keepers too, and I once had to run two around a flash head and attach the PvW to that. When you’re already on the job, just do whatever you have to to make it work.

No comments:
Post a Comment